
WordPress Moshtix Integration – Documentation
WordPress Moshtix connects your website to your Moshtix account and pulls your events into WordPress automatically, so ticket buyers can browse events embedded within your website.
Contents
Purchasing the plugin
Purchase WordPress Moshtix through our secure checkout. The checkout is handled by Freemius, our payments partner, so your card details are processed through a secure payment gateway.
Once your payment is complete, you’ll receive an email containing a download link for the plugin and your license key. Keep this email handy, you’ll need the license key when you activate the plugin.
Installing the plugin
- Download the plugin zip file from the link in your purchase email.
- In your WordPress dashboard, go to Plugins > Add New Plugin.
- Click Upload Plugin and select the zip file you downloaded.
- Click Install Now, then Activate Plugin.
- When prompted, enter the license key from your purchase email to activate your subscription.
Once activated, a new Moshtix menu will appear in your WordPress dashboard. This is where you’ll connect your Moshtix account and configure how your events display.
Credentials
The Credentials tab connects the plugin to your Moshtix account so it can pull your events through the Moshtix API.
- Log in to your Moshtix account.
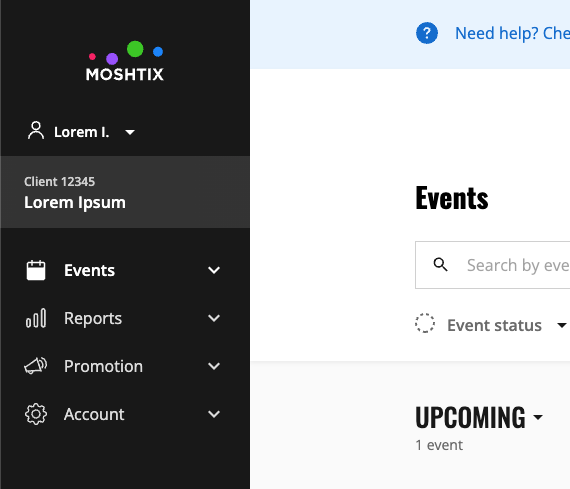
- Find your Client ID at the top left of your Moshtix dashboard. (See below)
- Generate a Moshtix API key by following Moshtix’s guide: How to Generate a Moshtix API Key.
- Enter your Client ID and API Key into the Credentials tab, then save.
Shortcodes and blocks
The WordPress Moshtix integration plugin comes with two block/shortcode pairs. The pairs have the same functionality. When using the blocks the parameters are set in the block editor sidebar. The same parameters are passed into the shortcodes.
Shortcodes and blocks
The Moshtix Events Query block and [moshtix_events_query].
This is the simplest use case of the plugin. Adding this shortcode/block will query the database for your Moshtix events and render them to the page. For styling see the section on Custom CSS.
There are three parameters used with Moshtix Events Query:
Maximum (‘maximum’)
This is the maximum number of events to display. The default is -1 to display all.
Categories (‘categories’)
The Event Categories are standard WordPress categories. However, they are only ever pulled directly from Moshtix – they cannot be edited within WordPress. This prevents any overlap from typos etc. Add categories to include using their slugs – hyphenated and lower case. i.e. Live Music is added using ‘live-music’. Comma separate the category slugs to include multiple categories. i.e. ‘live-music,punk’.
Heading Level (‘heading_level’)
The heading level allows you to specify which html heading tag to use for the event titles. Headings will be rendered using your theme defaults for that heading. When choosing your heading level be sure not to skip heading levels, for accessibility. The default heading level is H2.
Examples
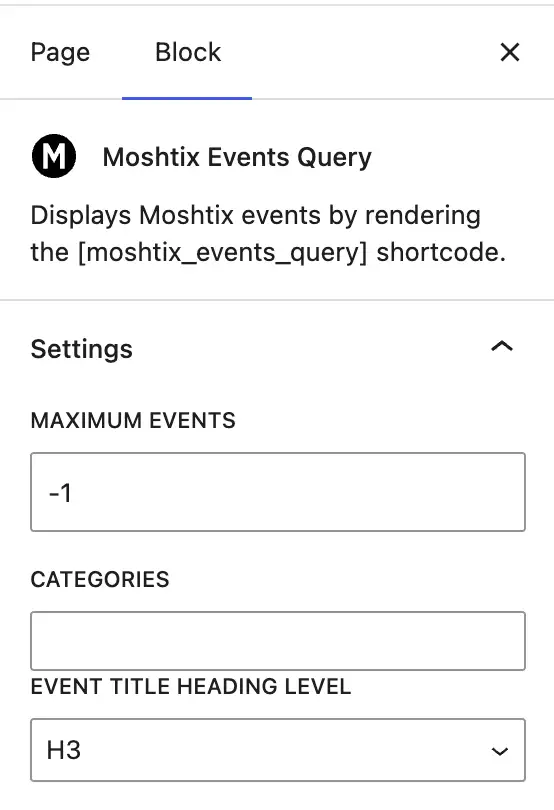
To show all events within all categories and an H3 heading level use:
[moshtix_events_query heading_level=‘3′]
This is the same as using these block settings:
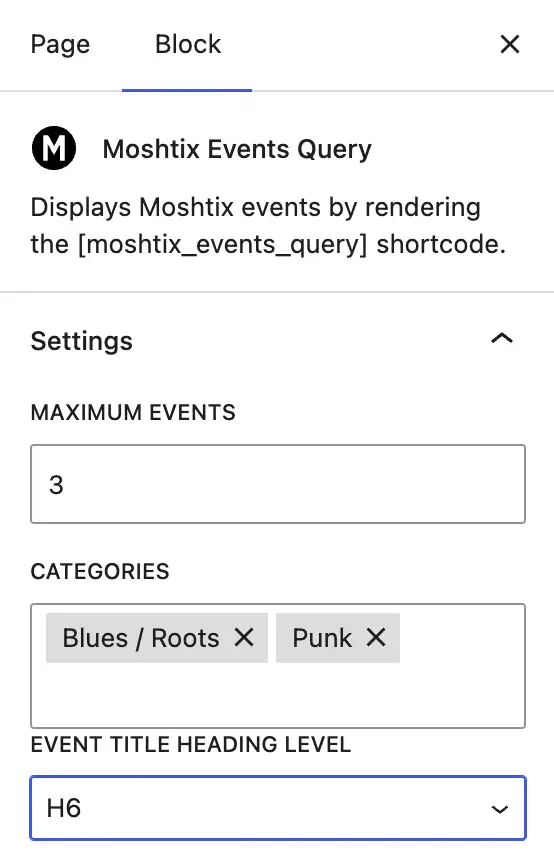
To show the three most recent events, within the Blues/Roots and Punk categories and, to render the titles within H6 tags use:
[moshtix_events_query maximum=3 categories=’blues-roots, punk’ heading_level=’6′]
This is the same as using these block settings:
Add events to a custom loop
If you want to create your own query loops for events you can use the Moshtix Event block/shortcode. Moshtix Event renders the same as the individual event cards of the Moshtix Event Query.
** Please note that this block/shortcode is designed to work only within a loop. If it is added outside of a loop it will just render default content. **
An example is if you have created your own carousel to display the events. Add the Moshtix Event block or shortcode to display the data for the current Event in the loop.
Only one parameter is passed to the Moshtix Event block/shortcode. That is for the Heading Level (‘heading_level’). See above for more details.
Example
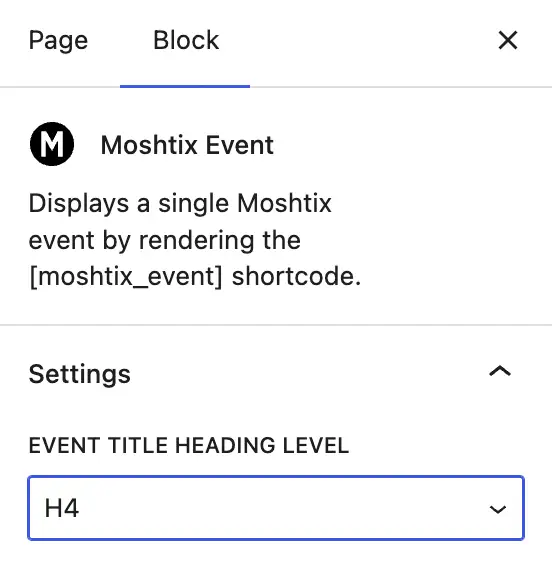
To add event cards to your loop, with H4 headings use:
[moshtix_event heading_level=‘4′]
This is the same as:
Add events to an Elementor loop
We have tested the Moshtix Event shortcode with Elementor post loops.
Before you can add the Moshtix Events to your loop you need to enable them. Go to Elementor > Editor > Settings. Under the General tab select Moshtix Events under the post types. Save.
Next go to Elementor > Editor > Tools. Under the General tab click the Clear Files & Data button. It is also worth updating the WordPress permalinks. Go to Settings > Permalinks and click save.
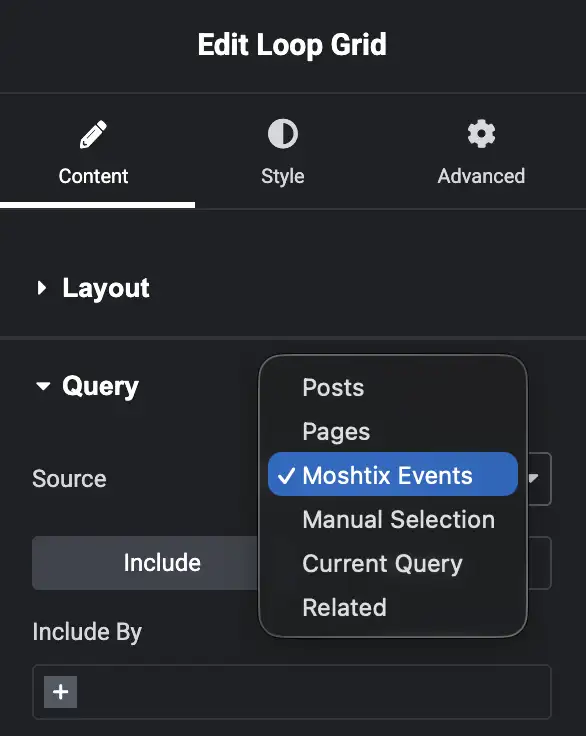
To build the Elementor Loop you will need a Pro licence. Once activated you will find the Elementor Loop Grid element. Add it to a container/section. In the left sidebar under Query change the source to Moshtix Events.
For best results style the cards using the Moshtix WordPress plugin’s CSS settings.
Plugin Settings – Display
The Display tab controls how your Moshtix events appear on your site: their fallback image, button wording, and the availability badge shown on each event.
| Field | Description |
|---|---|
| Placeholder Image | The fallback image for events that have no image of their own. If none is chosen, the plugin’s built-in placeholder is used. For best results use an image 600x600px. |
| Button Text | The wording on each event’s button, which links through to Moshtix to buy tickets. |
| Before Tickets Go On Sale Text | Shown on an event’s availability badge before its tickets go on sale. |
| Ticket Sales Closed Text | Shown on an event’s availability badge once all its ticket sales have ended. |
On-sale ticket availability badges
While tickets are on sale, the badge on each event shows allows you to inform your customers how fast tickets are selling. The Remaining Tickets % column allows you to assign thresholds, under which the badges will display. For example, if 100% of tickets are still available, its matching label will be displayed. Once sales get to 50% or less the next threshold will be reached and the next label will be displayed.
The plugin comes preloaded with five thresholds:
| Label | Remaining tickets % |
|---|---|
| Tickets available now | 100% |
| Tickets are selling fast | 50% |
| Few tickets left | 10% |
| Almost sold out | 3% |
| Sold Out | 0% |
Custom CSS
Add your own CSS to fine-tune how Moshtix events look on your site. This CSS loads on every page, so target the plugin’s classes rather than broad selectors (see the plugin selectors).
The plugin ships with default CSS to style your event cards. If you clear this field, no CSS is applied and events will display unstyled. This design ambiguous approach gives you complete control, without competing against any built in styling. If you make a mess of your CSS, click Reset to Default to restore it.
-
Target these classes when writing your own CSS:
.wpmx-events-list.wpmx-event-image.wpmx-event-title.wpmx-event-dates.wpmx-event-teaser.wpmx-event-sale-threshold.wpmx-event-button
-
:root {

  --wpmx-font-size: 16px;

  --wpmx-grid-col-width: 24em;

}

.wpmx-events-list.wpmx-shortcode {

font-size: var(--wpmx-font-size);

--grid-cols: repeat(auto-fill, minmax(min(var(--wpmx-grid-col-width), 100%), 1fr));

--grid-gap: 1em;

list-style: none;

padding-inline-start: unset;

display: grid;

grid-template-columns: var(--grid-cols);

gap: var(--grid-gap);

}

.wpmx-events-list li {

position: relative;

}

.wpmx-event {

border: 1px solid oklch(87.2% 0.01 258.338);

position: relative;

border-radius: 0.5em;

overflow: hidden;

transition: box-shadow 200ms cubic-bezier(0.4, 0, 0.2, 1);

}

.wpmx-event:has(:hover, :focus-visible) {

box-shadow:

0 10px 15px -3px rgb(0 0 0 / 0.1),

0 4px 6px -4px rgb(0 0 0 / 0.1);

}

.wpmx-event:has(:hover, :focus-visible) img {

transform: scale(1.05);

}

.wpmx-event-image {

display: flex;

margin-bottom: unset;

overflow: hidden;

}

.wpmx-event-image img {

width: 100%;

height: 100%;

transition: transform 200ms cubic-bezier(0.4, 0, 0.2, 1);

}

.wpmx-event-content-container {

--padding: 1.5em;

display: flex;

flex-direction: column;

padding: var(--padding);

}

.wpmx-event-content-container * {

margin: unset;

}

.wpmx-event-title {

font-size: 1.125em;

line-height: calc(1.75 / 1.125);

color: oklch(21% 0.034 264.665);

}

.wpmx-event-time {

margin-top: 0.5em;

font-size: 0.875em;

line-height: calc(1.25 / 0.875);

color: oklch(44.6% 0.03 256.802);

}

.wpmx-event-teaser {

margin-top: 1em;

font-size: 1em;

line-height: calc(1.5 / 1);

color: oklch(44.6% 0.03 256.802);

}

.wpmx-event-teaser:empty {

display: none;

}

.wpmx-event-button-container {

margin-top: 1.5em;

}

.wpmx-event-button a {

font-size: 0.875em;

line-height: calc(1.25 / 0.875);

padding-inline: 0.75em;

padding-block: 0.5em;

color: #fff;

border-radius: 3.4e38px;

background-color: oklch(21% 0.034 264.665);

text-decoration: none;

}

.wpmx-event-button a::after {

content: "";

position: absolute;

inset: 0;

}

.wpmx-event-sale-threshold {

--background-color: oklch(96.7% 0.003 264.542);

--text-color: oklch(44.6% 0.03 256.802);

position: absolute;

top: var(--padding);

left: var(--padding);

border-radius: 0.375em;

padding-inline: 0.5em;

padding-block: 0.25em;

font-size: 0.75em;

line-height: calc(1 / 0.75);

font-weight: 500;

background-color: var(--background-color);

color: var(--text-color);

}

.wpmx-event-sale-threshold:empty {

display: none;

}

.wpmx-event-sale-threshold.open.tickets-available-now,

.wpmx-event-sale-threshold.open.tickets-are-selling-fast {

--text-color: oklch(52.7% 0.154 150.069);

--background-color: oklch(96.2% 0.044 156.743);

}

.wpmx-event-sale-threshold.open.few-tickets-left,

.wpmx-event-sale-threshold.open.almost-sold-out {

--text-color: oklch(55.5% 0.163 48.998);

--background-color: oklch(96.2% 0.059 95.617);

}

.wpmx-event-sale-threshold.open.sold-out {

--text-color: oklch(50.5% 0.213 27.518);

--background-color: oklch(93.6% 0.032 17.717);

}
Root variables
The default CSS uses two root variables that control the overall look of your event cards:
| Variable | Default | Controls |
|---|---|---|
| –wpmx-font-size | 16px | The root size of the card. All font sizes, spacing, and the View Event button scale proportionately based on this value. |
| –wpmx-grid-col-width | 24em | The width of the cards. The CSS grid automatically determines how many cards to show on any screen size based on this value. |
Advanced
| Field | Description |
|---|---|
| Webhook Secret | A private passcode used to verify that webhook requests genuinely come from Moshtix. Leave it as the automatically generated value unless you need to set a specific one. |
| Remove Data Upon Uninstall | If checked, deleting the plugin also erases all of its data, including your settings, synced events, and ticket counts. Leave unchecked to keep that data in case you reinstall. Deactivating the plugin never deletes anything, only a full delete does. |
Syncing Your Events
The Sync page keeps your site’s events in step with Moshtix. Run a manual sync to import or refresh everything now, then subscribe to webhooks so Moshtix keeps your site up to date automatically.
Tools
Sync posts fetches all your events from Moshtix and creates or updates the matching posts on your site. Run it for your first import, or any time you want to force a full refresh.
Webhooks
Once subscribed, webhooks let Moshtix notify your site the moment something changes, so your events stay current without a manual sync.
- Event Saved: adds new events and updates event details whenever they change in Moshtix.
- Order Saved: updates an event’s ticket availability as tickets sell.
A status table shows whether each webhook is subscribed, when it was last updated, and gives you the option to unsubscribe.
Exclude Event IDs
A space-separated list of Moshtix event IDs to exclude. Events with these IDs will be skipped when importing via webhook or Sync posts.
If you to omit certain Events from your feed you can add their IDs to this fields. The IDs are found in Moshtix on the Events themselves.
Add the IDs to this field, separated by a single space.
Delete Plugin Data
This option allows you to purge all of the WordPress Moshtix integration data from your WordPress database when deleting the plugin. This is good house keeping if you decide that you no longer wish to use the plugin.
Events
The plugin creates your events as a custom post type in WordPress, pulled directly from Moshtix. You’ll find them listed under the Moshtix menu in your dashboard.
Event fields aren’t editable in WordPress. Moshtix is the source of truth, so make any changes to your events in Moshtix and they’ll sync through to your site.
Logs
The Logs page records the plugin’s activity, such as webhook events received from Moshtix, sync actions, and any errors. Use it to check that syncing is working correctly or to troubleshoot an issue.
Each entry shows the type of event, the time it occurred, a status code, and a message describing what happened.
Account & subscription
The Account page manages your WordPress Moshtix subscription. It’s provided by Freemius, our payments partner, and is split into three sections.
Account Details
Shows your account name, email, plan, and license key, along with your current plugin version and whether an update is available. From here you can also:
Billing
Store your business name, tax or VAT ID, and address for invoicing purposes.
- Deactivate your license on this site, to move it to another site
- Change your license key
- Sync your license with Freemius
- Cancel your subscription
Payments
A history of your past payments, each with a downloadable invoice.
Contact Support
Need a hand? Use the Contact page in your WordPress dashboard to send a support request directly to our team.